FEATURES
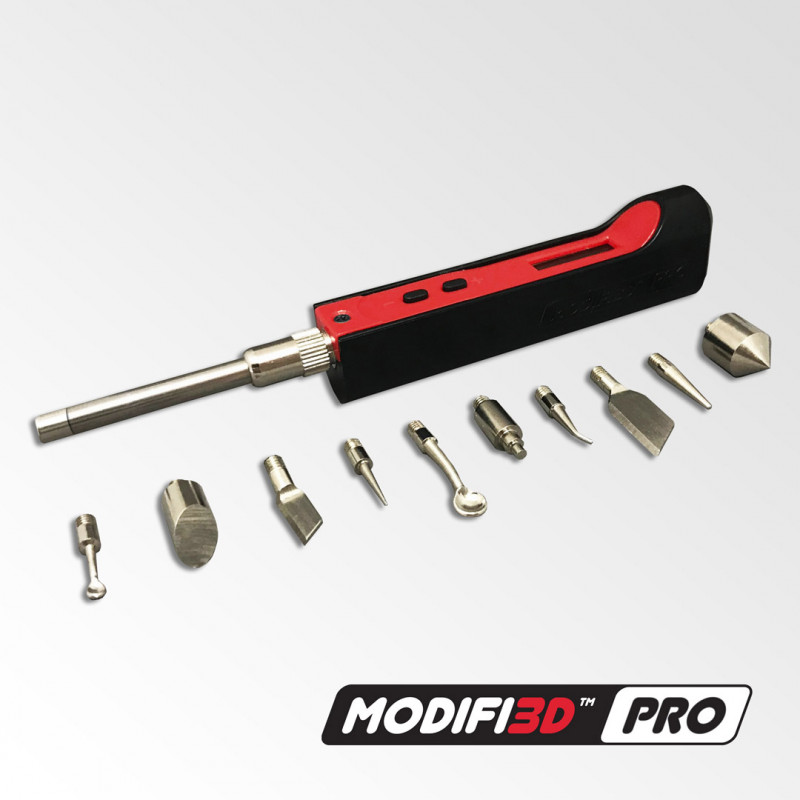
10 interchangeable tips.
Special tip coating to prevent sticking.
Simple and easy to use.
Fast heating to 200ºC in less than 25 seconds.
LCD display.
Adjustable temperature control.
Power 30W (450ºC Maximum Temperature)
Adjustable standby and shutdown modes.
Base stand included.
3D PRINTING
Although 3D printers are constantly improving, they don't always produce perfect parts directly from the print bed and all kinds of printing errors can occur. So, in response to customer feedback and suggestions, the Modifi3D PRO version was developed to meet their advanced needs with additional features.
WHAT IS MODIFI3D PRO?
Modifi3D PRO is an evolution of the 3D printing tool. It is now more durable and has more power. Adjustable temperature control with an LCD display has been achieved. The temperature can now be set up to 450ºC to allow for the future potential of new tips and accessories.
The PRO is designed to replace much of the sanding scraping and finishing of your 3D prints, and comes with 10 interchangeable tips. The new improved tips are stronger than before and provide more features including the ability to produce countersinks and set threaded inserts.
TECHNICAL SPECIFICATIONS
Power: 30W
Input: 24V DC
LCD display (adjustable temperature control)
Temperature range: 150-450ºC
Handle size: 29 x 17 x 100mm (excluding tips)
Handle weight: 30g approx.
DC power supply (US, EU, UK, AU)
Cable: 1.5m long to 3.5 x 1.35mm DC plug
HOW MODIFI3D PRO WORKS
Modifi3D PRO is easy to use and takes the frustration out of finishing 3D prints. Just plug it in and it can be ready to use in 20-25 seconds. The PRO also has options for standby and power off modes if not in use (a basic stand is included, but you can print your own PRO stand/tool holder with the downloadable 3D file).
Below are the basic instructions (note that these are subject to change and full detailed instructions will be provided in the Modifi3D PRO box.
GET STARTED
1. Select a tip and insert it into the device cover tube. Leave the device cover tube and locking nut in place (this is for rotational adjustment only, if needed).
2. Place the Modifi3D PRO on the included stand.
3. Plug the Modifi3D PRO's DC outlet and plug in the wall adapter.
4. Once connected to power, the LCD will show the version number for a few seconds and then change to the current temperature. The initial preset temperature is 300°C.
TEMPERATURE ADJUSTMENT
To set the temperature, press the +/- buttons until the desired temperature is selected.
After a few seconds the LCD will show the current temperature.
The temperature is adjusted in 1°C increments. To adjust in 10°C increments click the + or - a few times and then hold down.
STAND-BY / OFF MODE
If the Modifi3D PRO is idle for the selected stand-by time, it will enter stand-by mode and the temperature will drop to the selected stand-by temperature. While in stand-by mode, it will go into power-off mode after the selected time.
When Modifi3D PRO is moved, it will automatically wake up and switch to work mode and the temperature will rise to the last selected temperature.
Modifi3D PRO has a setting mode that can be used to adjust the default stand-by and power-off times and temperatures.
Detailed instructions will be provided in the Modifi3D PRO box.
EDITING TIPS
1. To change tips, disconnect DC power and let the tips cool.
2. Unscrew the existing tip from the end of the device cover tube (leave the device cover tube and locking nut in place)
3. Replace with the selected tip.
4. If you wish to rotate the tip, loosen the locking nut slightly and rotate the device cover tube. Once the correct angle is reached, simply tighten the locking nut.
5. Connect the power supply.
TIP MAINTENANCE
Clean the tips before use to keep them in good condition.
Do not keep the Modifi3D PRO on for an extended period of time, as this will break the special coating on the tips.
Do not apply excessive pressure to the tip during use to avoid damaging the tip or device assembly. Let the heat do the work.
Never clean the tips with abrasive materials.
NOTE ON HEATING
The temperature shown on the LCD display is the temperature of the heating element. Due to the different sizes and shapes of the tip, the heat transfer to the edge of the tip may vary slightly and therefore the actual temperature of the tip may also vary from that shown on the display.


