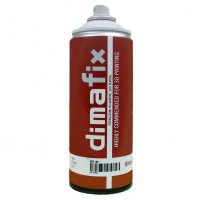
What is Dimafix®?
Dimafix® is a product from DIMA 3D to be used for better adhesion of material to the print surfaces of heated-platen FDM printers.
Dimafix® has been developed in two different formats: a spray and a stick.

What are the features of Dimafix® 3D printer adhesives?
Dimafix® is designed for 3d printers with FFF technology (also called FDM) and with heated platen.
Let's see the main features here:
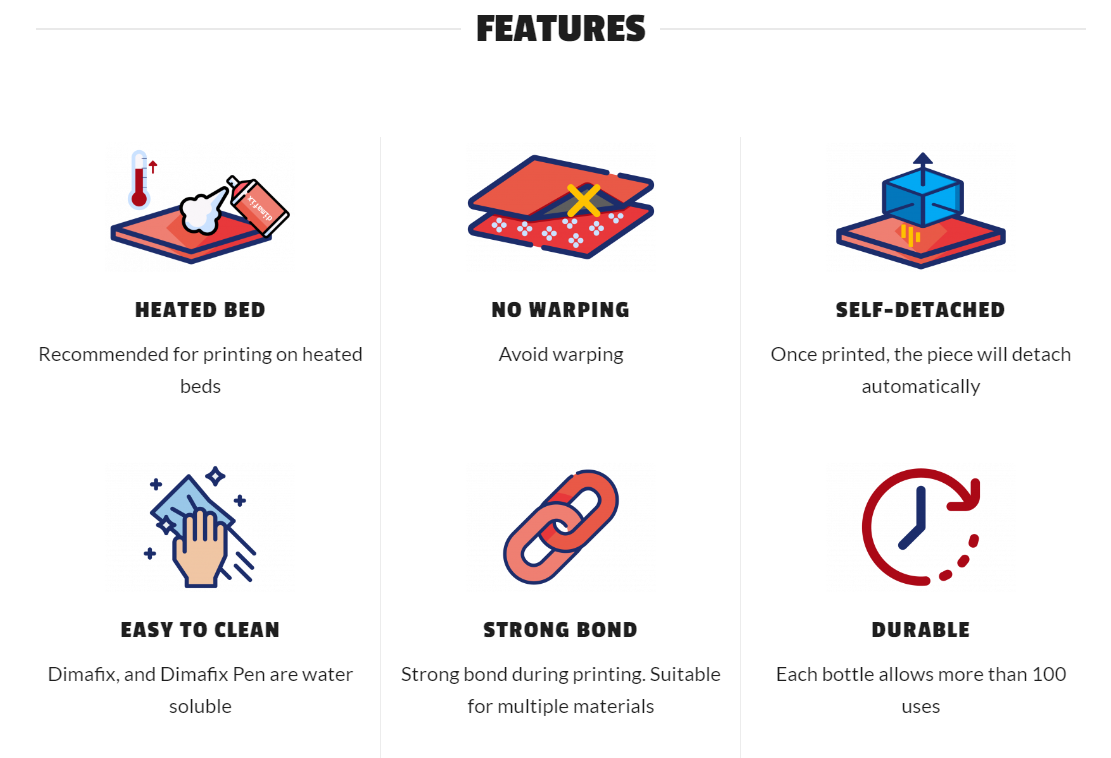
- It provides excellent adhesion between the first plastic layer and the glass (or other surfaces) used as a base, preventing deformation.
- It is suitable for various types of thermoplastics, especially ABS.
- The adhesion property is activated when the temperature of the heated bed is above 50ºC.
- When the bed is hot, the adhesive effect works even in large prints by preventing "warping."
- When the temperature of the heated bed drops (<50ºC), the adhesive effect disappears and the pattern comes off easily.
- It is soluble, so it is easily cleaned only with water, which is why it can be used on all printing surfaces.
- It has a long shelf life, in fact it allows more than 100 applications in both spray and stick versions.
How to use Dimafix®?
The first layers of the printing process will be fixed firmly with Dimafix® on the hot surface and will remain where the part will be printed until the surface cools. Using this adhesive for 3D prints will prevent unwanted effects or deformation. Once the printing process is finished and the temperature of the heated platen is below 50ºC, the model can be removed effortlessly and no tools are needed that could damage the part or the printing surface being used.
What are the steps to follow for proper application of Dimafix®?
- Shake well Dimafix® Pen / Dimafix® Spray before use
- Clean the print bed of your 3D printer
- Check that the temperature of the platen is below 50°C (122°F)
- Apply Dimafix® Pen / Dimafix® Spray to the print bed (when the bed is cold)
- Wait a few seconds for the adhesive layer to dry
- Heat the print bed to the appropriate temperature for the filament used and start printing
- When printing is finished, wait for the print bed to cool down
- Remove the printed piece from the printing table (when the table is cold)
Since these are chemical compounds, it is preferable to use them in a well-ventilated room.
Let's take a closer look here at the technical specifications of Dimafix®
How does the adhesion of Dimafix® vary with temperature?
Dimafix® is a smart adhesive that varies its adhesion properties based on temperature in the range that is usually used for FDM 3D printing. As can be seen in Figure 1 Dimafix® increases adhesion as the print bed is heated. The test was performed with ABS filament and a glass base.
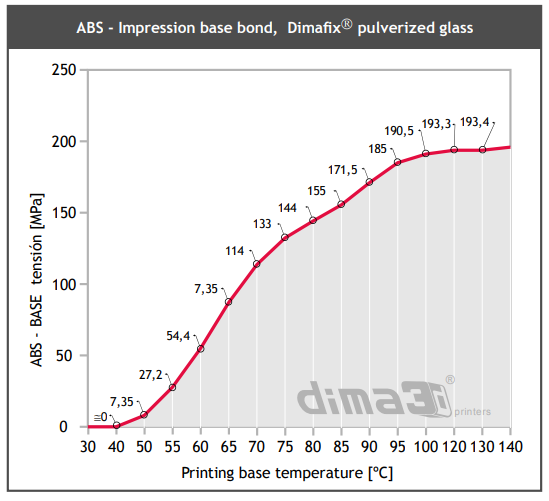
Figure 1. ABS - Change in print bed tension as a function of temperature.
What is the best printing base to use Dimafix®?
Dimafix® ensures maximum adhesion of ABS to glass printing surfaces. Regular, heat-treated or borosilicate glass can be used.
How does Dimafix® perform with ABS?
Dimafix® provides different adhesion values between the printed parts and the bed as the temperature changes. This is an essential feature for 3D printing and allows to distinguish four regions of operation in which the user can achieve different useful behaviors by setting different bed temperature values.
We see the different behavior detected during testing based on temperature in Figure 2. This allows for excellent results in ABS prints with your 3D printer!
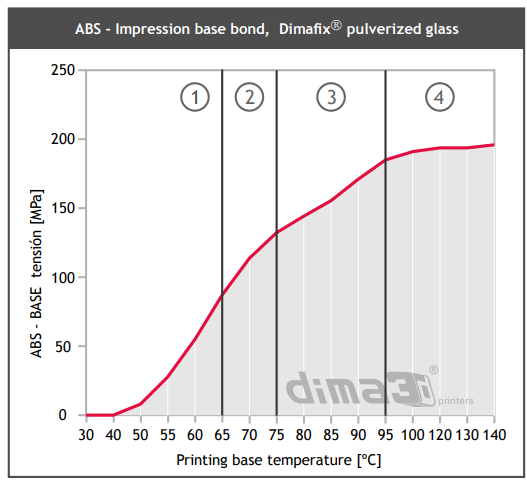
Figure 2. Operating regions of Dimafix®
What are the operating temperature ranges for Dimafix®?
As mentioned earlier, Dimafix® has four operating temperature ranges that vary its adhesion power (Figure 3).
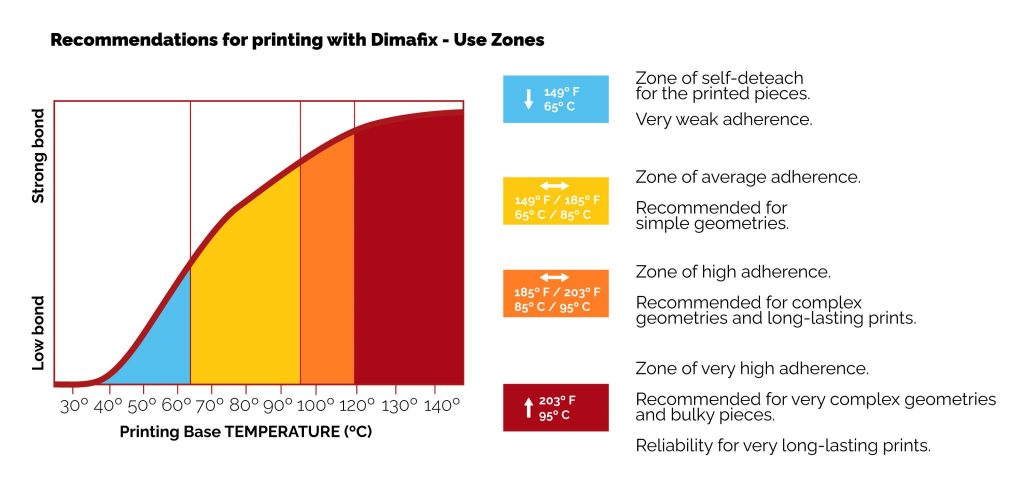 Figure 3. Characteristics of Dimafix® for different operating temperature ranges
Zone 1: Plane temperature below 65°C (149°F)
In the heating phase, this zone is characterized by poor adhesion. In the cooling phase at the end of printing, as the temperature drops, adhesion loses power allowing the printed parts to come off on their own without having to strain. For this reason it is also called the "self-detachment" zone.
Zone 2: Platen temperature between 65°C and 75°C (149°F - 167°F)
We are in the medium-grip zone. Recommended for simple parts without edges, vertices or complex geometries.
This is the ideal temperature for rounded bases, bevels, curves, etc., or for thin, long and thick profiles at the same time. Ideal for prints with not excessively long lifetimes.
Zone 3: Bed temperature between 75°C and 95°C (167°F - 203°F).
At these temperatures we find the high tack region. Any kind of geometry can be printed, especially for parts up to 200 × 200 mm (7.87 × 7.87 in.). It is recommended for obtaining good quality in sharp edges and vertices that are affected by high cooling stresses. It can give good results for prints that have a long service life and for which you want a guarantee on the adhesion of the part to the plane throughout the build process.
Zone 4: Bed temperature between 95°C and 120°C (203°F - 248°F).
Zone of maximum adhesion. Parts of any size and geometry can be printed at these temperatures without deformation. The adhesion tension between the part and the bed is maximum, allowing any stress concentration factor. In this fourth zone are the optimum values to ensure the best quality in edges and vertices, which generally tend to concentrate internal stresses due to thermal stress.
These settings are also recommended for printing large and complex parts that require long printing times. The maximum area tested so far has been 400 mm × 400 mm (15.75 × 15.75 inches) printing continuously for more than 48 hours. Not all 3D printers have heated platters that can reach these temperatures, so you need to check in the data sheet of your printer, or with the manufacturer.
The performance of the resulting print can greatly improve with the use of these thermal adhesives, but remember that successful printing is subject to many other parameters. In particular, one must pay attention to the filament used and its storage, the settings of slicing and the configuration of one's 3D printer.
You can see in Figure 4 the trend of the theoretical characteristic curve of the adhesion power of Dimafix® - measured in Mpa - in the different zones.
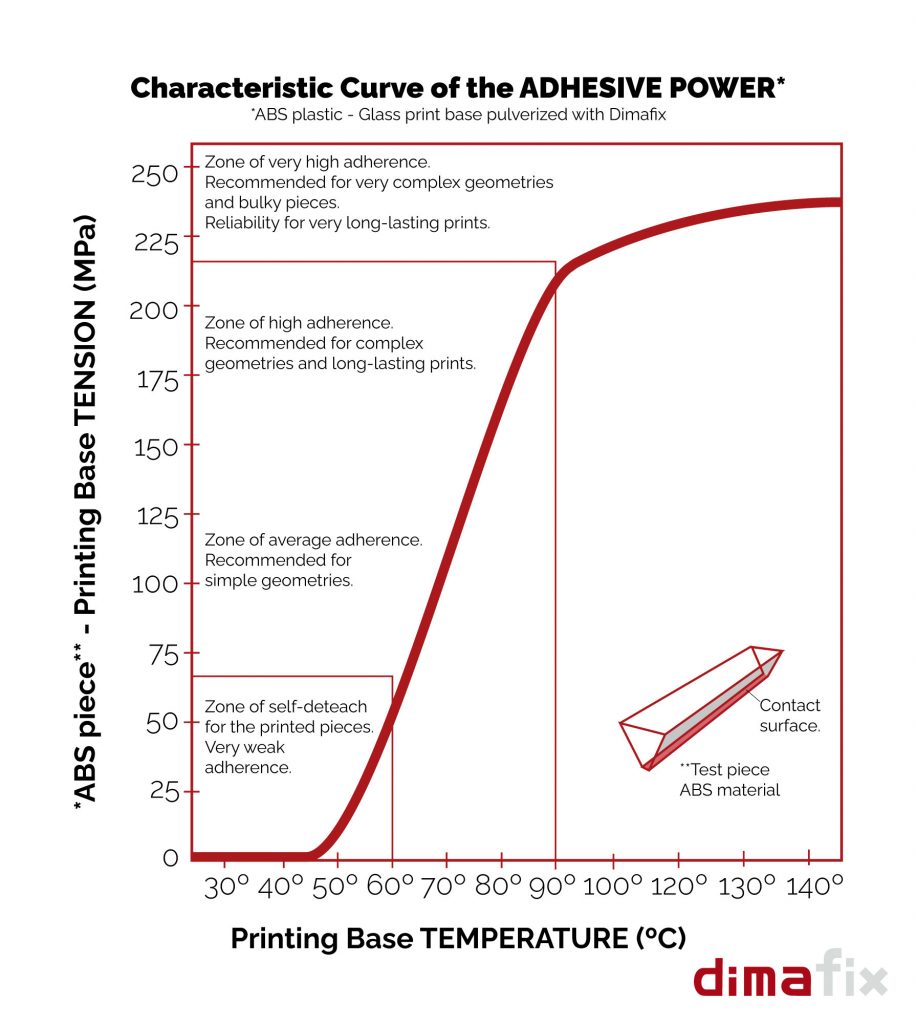
Figure 4. Adhesive power curve of Dimafix®
What is the difference between a normal lacquer and Dimafix®?
A comparison between the use of Dimafix® Spray and normal hairsprays can be seen in Figure 5. The test was carried out at plane temperatures between 75°C and 100°C (167°-230°F).
The results confirm that the deformations at the solid end are much smaller with Dimafix®. In fact, already at 75°C (167°F), the deformation with a normal lacquer is five times larger than that with Dimafix® at the same temperature. As the temperature of the printing bed increases, the adhesion of Dimafix® becomes even stronger and the deformations become up to one hundred times smaller.
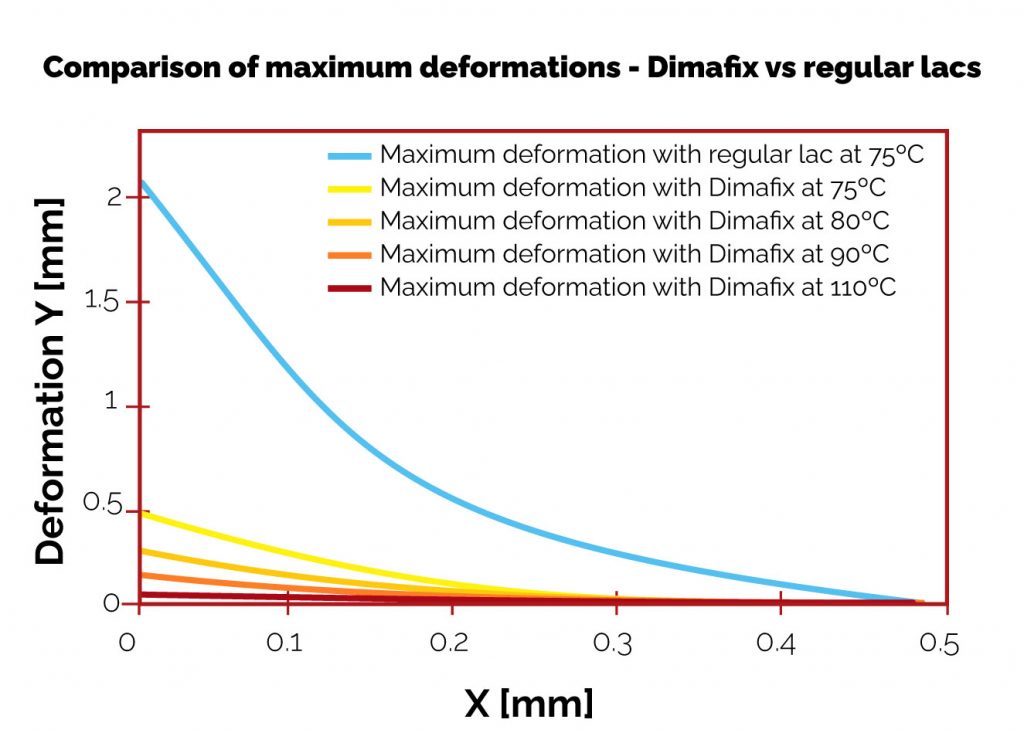
Figure 5. Deformations at different temperatures - Dimafix® vs. normal lacquers
Finally, let's look at some of the questions we most often receive about Dimafix®
What to choose between Dimafix® Spray and Dimafix® Stick?
The choice between either format is indifferent from the point of view of the end result. They both have the same characteristics and performance in terms of adhesion. With the spray format it is easier to create an even layer on the printing surface, while for the first applications with the stick it may be more difficult to spread it evenly. In fact, with this version it is necessary to dose the fixative well over the entire area of the plate that will later be used for printing; proper agitation before spreading it on the plate is also important. An uneven application can go to affect the final result.
How do you clean Dimafix® from the printing plate?
The Dimafix® both spray and stick can be removed with simple water. Cleaning should be done when the platen is cold.
What filaments is Dimafix® recommended for?
Dimafix® provides a strong grip between the printed material and the print bed so that "warping" is no longer a problem even in large prints. This is why it is mainly recommended with filaments such as ABS and ASA and derivatives thereof.
What printers can I use Dimafix® for?
Dimafix® can be used in FDM 3D printers that are equipped with a heated platen. It would be optimal for the platen to reach temperatures up to 100°C-120°C, but already from 70°C-80°C it succeeds well in its use.
What print base can I use with Dimafix®?
Dimafix® is usually used on glass printing bases. It can be regular, tempered or borosilicate glass. It can also be used, however, directly on aluminum plate or even on flex planes.
If I have a PEI plate, can I use Dimafix®?
With a PEI platen, whether smooth or textured, it should not be necessary to use adhesives to keep the molded part adhered to the platen.
In some cases, however, when PEI has already been used many times, or for particularly complex 3D parts, you can use Dimafix® without any problems.
What is the durability of a Dimafix®?
Both Dimafix® spray and Dimafix® stick can be used for up to 100 applications with a medium-sized print area. The durability depends greatly on the amount applied per individual print. Remember that it is not necessary to repeat the application of Dimafix® with each print, but we recommend cleaning and reapplying it at the first signs of poor adhesion of the part to the plane during printing.
To recap, why choose Dimafix®?
Dimafix® prevents deformation of printed objects, which is ideal for ABS and ASA, and because of its special adhesive characteristic, it allows the model to be removed without difficulty. In addition, it is removable from the used surface quickly and easily with water.
Need technical support?
Check the product sheet for all the technical information, or CONTACT US.
Follow our social media to stay up to date with news and special discounts!


